
Storm Roof Damage UK: How to Spot It Safely and What to Do Next

Quick answer: After a storm, check from ground level for missing tiles, debris in the garden, sagging guttering, and lifted flashing, and check inside for new damp patches or musty smells in the loft. Avoid climbing onto the roof yourself. A drone survey or professional inspection can safely confirm the damage and provide evidence for an insurance claim. High winds, heavy rain, and sudden temperature swings all take a toll on UK roofs, and the damage is not always obvious straight after a storm passes. A tile can shift just enough to let water in without falling off completely, and flashing can lift at the edge without being visible from the ground. Knowing what to look for, and how to check safely, can be the difference between a small repair and a much larger internal water damage problem weeks later. This guide walks through what to check after severe weather, the warning signs that point to hidden damage, and when it is time to call a professional rather than get up on the roof yourself. Why UK Weather Is Particularly Hard on Roofs The UK does not experience the extreme heat or seismic activity that drives roof design in some other countries, but its weather pattern creates its own unique stresses. Roofs are regularly exposed to strong, gusting winds, especially in coastal and elevated areas, combined with persistent rainfall that gives water every opportunity to find a way in through even a small gap. Freeze thaw cycles, where moisture trapped in small cracks freezes and expands during cold snaps, then thaws again, gradually widen existing weaknesses over successive winters. This means storm damage is rarely an isolated event. It is often the final failure point of wear that has been building for years, triggered by one particularly strong gust or heavy downpour. What to Check From the Ground After a Storm Before considering any closer inspection, a careful look from ground level, or from an upstairs window with a clear view of the roof, can reveal several common issues. Missing or Displaced Tiles Look for gaps in the tile pattern, or tiles that appear to be sitting at a different angle to those around them. A single displaced tile is often the first visible sign that wind has lifted the roof covering. Debris in the Garden or Guttering Fragments of tile, slate, or ridge cement found in the garden or blocking guttering are a clear indicator that something has come loose from the roof, even if you cannot immediately see where from. Sagging or Detached Guttering Guttering pulled away from the fascia, hanging at an odd angle, or overflowing during rain despite not being blocked with leaves usually points to storm related stress on the fixings. Visible Damage to Chimneys or Aerials Chimney stacks and aerials act as tall, exposed points that catch more wind load than the surrounding roof. Cracked pointing, leaning stacks, or a dislodged aerial bracket are worth noting for a closer inspection. Flashing Lifted at Roof Junctions Flashing around chimneys, dormer windows, and roof valleys is designed to sit tight against the surface below it. Any visible gap, curling edge, or flashing that appears to be flapping in wind is a sign it may no longer be sealing properly. Signs of Hidden Storm Damage Inside the Property Not all storm damage is visible from outside, and some of the clearest evidence shows up inside the home in the days following bad weather. New Damp Patches on Ceilings A patch that was not there before a storm, particularly one that grows or darkens after subsequent rain, strongly suggests water is entering through a new gap in the roof covering. Our guide to tracing a roof leak back to its source explains why the stain rarely sits directly beneath the actual entry point. Musty Smells in the Loft Even before visible staining appears, a sudden musty or damp smell when opening the loft hatch can indicate moisture has started collecting in the roof space. Water Stains Around Chimney Breasts Because chimneys are common failure points for flashing, water stains appearing on walls or ceilings near a chimney breast after a storm are a common and specific warning sign worth acting on quickly. Drips or Active Leaks During Heavy Rain An active drip during rainfall is the clearest possible sign of a breach, and should be addressed as an emergency rather than left until the next dry spell, since ongoing water ingress accelerates timber and insulation damage significantly. Why You Should Not Inspect Storm Damage From the Roof Yourself It is tempting to grab a ladder and take a closer look immediately after noticing a problem, but roof surfaces are significantly more dangerous after storms than they appear. Wet tiles are slippery even when dry weather has returned, loose debris can shift underfoot without warning, and any damage already present may not be able to bear normal foot traffic safely. A drone roof survey offers a far safer alternative, capturing detailed images of the entire roof surface without anyone needing to climb up. This is particularly useful immediately after a storm, since it creates a clear, dated record of the damage that can support an insurance claim, something we cover in detail in our guide to drone roof surveys. Making an Insurance Claim for Storm Roof Damage Most UK home insurance policies cover storm damage as standard, though the exact definition of a qualifying storm varies between insurers, typically requiring wind speeds above a certain threshold recorded for the area at the relevant time. To support a claim effectively, gather dated photographs of the damage as soon as safely possible, note the date and approximate time the damage occurred if known, and avoid making permanent repairs before the insurer has had a chance to assess the damage, beyond temporary measures needed to prevent further water ingress such as a tarpaulin over an exposed section. A written report from a qualified roofer, ideally supported by drone survey imagery, gives
Drone Roof Survey UK: What It Reveals and Why More Homeowners Are Choosing It

Quick answer: A drone roof survey uses a camera-equipped drone to capture close, high resolution images of an entire roof without anyone climbing onto it. It reveals cracked or missing tiles, damaged flashing, blocked guttering, and, with thermal imaging, trapped moisture. It cannot assess the roof void or timbers directly, so it is often paired with an internal loft inspection. Traditional roof inspections rely on ladders, scaffolding, or someone walking across tiles that were never designed to be walked on. A drone roof survey removes that risk entirely while capturing images sharp enough to spot a hairline crack from ground level. It has quickly become one of the most requested inspection methods for UK homeowners dealing with insurance claims, pre purchase surveys, or simply wanting to know the true condition of their roof before committing to repairs. This guide explains exactly what a drone roof survey involves, what it can and cannot tell you, and when it makes sense to request one. What Is a Drone Roof Survey? A drone roof survey uses a remotely piloted aircraft fitted with a high resolution camera to capture detailed images and video of a roof from multiple angles, without anyone needing to physically access the roof surface. The operator controls the drone from the ground, flying a controlled pattern over the property to photograph every elevation, valley, and junction. The resulting images are reviewed by a qualified roofer or surveyor, who identifies defects, documents their location, and produces a report that can be used to support repair decisions, insurance claims, or mortgage requirements. How the Process Works Site Assessment Before flying, the operator checks for obstructions such as overhead power lines, nearby trees, and airspace restrictions, since certain areas near airports or other sensitive sites require additional permissions before a drone can be flown legally. The Flight The drone is flown in a systematic pattern across the roof, typically starting with a wide overview pass before moving in closer to capture detail on specific areas. Most residential surveys take between fifteen and thirty minutes to complete, depending on roof size and complexity. Image Capture Modern survey drones capture still images at resolutions high enough to zoom in on individual tiles, mortar joints, and flashing details after the flight, rather than relying on real time viewing alone. Some surveys also include thermal imaging, which can reveal moisture trapped beneath roofing materials that is not visible in standard photography. Reporting The images are compiled into a written report, usually annotated with markers showing the location and nature of any defects found. This report becomes the reference document for planning repairs, supporting an insurance claim, or reassuring a mortgage lender or buyer. What a Drone Roof Survey Can Reveal A well conducted drone survey can identify a wide range of issues that are difficult or impossible to spot from ground level, including: Cracked, slipped, or missing tiles and slates Ponding water on flat roof sections Damaged or perished flashing around chimneys and roof junctions Blocked or damaged guttering and downpipes Moss and algae growth affecting tile integrity Cracked or displaced ridge and hip tiles Signs of previous repair work that may need revisiting General wear patterns that indicate how much useful life remains in the covering Because the drone can capture images from angles a person on a ladder simply cannot reach safely, surveys often reveal defects on the far side of a roof or in valleys that have never been properly inspected before. What a Drone Roof Survey Cannot Tell You A drone survey is highly effective for visible external defects, but it has clear limitations. It cannot see beneath tiles, inside the roof void, or behind flashing, so it will not confirm the condition of roof timbers, insulation, or ventilation directly. It also cannot reliably assess structural strength purely from external images, since sagging or deflection often needs to be confirmed by physical inspection or measurement. For a complete picture, particularly where structural concerns or spray foam insulation are involved, a drone survey is usually paired with an internal loft inspection. This combination gives both the external condition and the internal structure, which matters when a mortgage lender or surveyor requires full visibility of the roof timbers, a common requirement discussed in our spray foam removal blog. Why Drone Surveys Are Becoming the Preferred Method Safety Roof access has historically been one of the most dangerous parts of property maintenance work. Removing the need for anyone to physically climb onto a roof eliminates fall risk entirely for the inspection stage, which matters both for the operator and for reducing liability for the homeowner. Access to Difficult Areas Steep pitches, tall properties, and roofs surrounded by conservatories or extensions can be genuinely difficult to inspect safely using a ladder. A drone reaches these areas without needing scaffolding or specialist access equipment, which also keeps costs down compared with erecting scaffold purely for an inspection. Speed A full drone survey of an average residential roof takes a fraction of the time required to erect access equipment and carry out a manual walk over inspection, meaning results are often available the same day. Documentation Quality Because every image is geotagged and timestamped, drone surveys produce a more thorough and defensible record than handwritten notes from a ground level visual check. This is particularly valuable for insurance claims, where clear before and after evidence can significantly speed up claim approval. When Should You Request a Drone Roof Survey? Before Buying a Property A drone survey ahead of purchase can reveal roof condition issues that a standard visual survey might miss, giving buyers stronger negotiating position or advance warning of upcoming repair costs. After Severe Weather Storms, heavy snow, or high winds can dislodge tiles or damage flashing in ways that are not obvious from the ground. A prompt drone survey after severe weather provides clear evidence for any insurance claim and identifies problems before they lead to internal water damage, as covered in our storm roof damage
Fascias and Soffits in the UK: Warning Signs, Function, and When to Replace Them
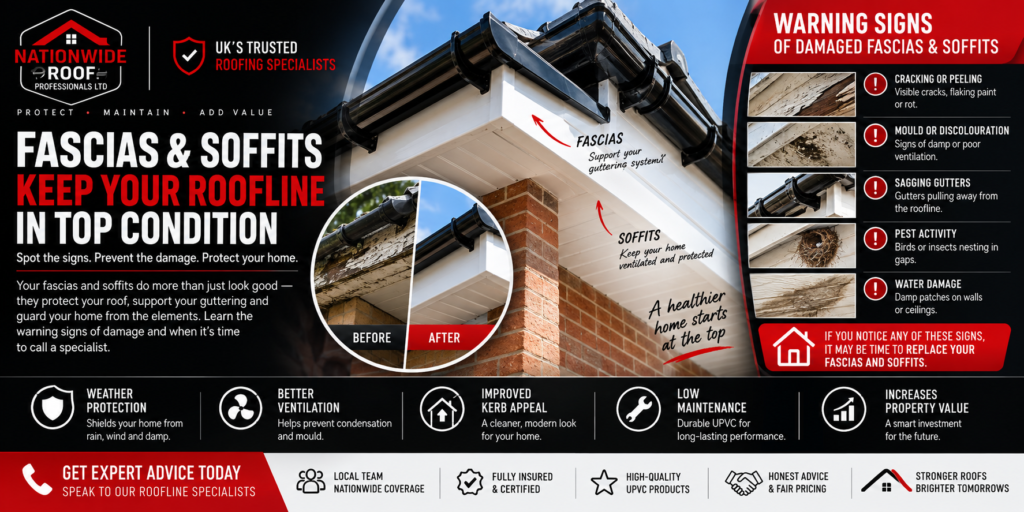
Quick answer: Fascias and soffits are the boards along your roof edge that support guttering, seal the roof void, and allow the loft to ventilate. Warning signs of failure include sagging gutters, peeling paint or rot on timber boards, water staining on walls, and pest activity in the loft. Left unrepaired, damage spreads into the roof structure itself. A cracked soffit board rarely looks urgent. It sits high above eye level, tucked under the roofline, and most homeowners never think about it until water starts coming through the ceiling below. Fascias and soffits protect the timber structure of your roof, and once they fail, the damage spreads fast. This guide explains what fascias and soffits actually do, the signs that yours are failing, and why replacing them early protects far more than the appearance of your home. What Are Fascias and Soffits? The fascia is the straight board that runs along the edge of your roof, fixed to the ends of the rafters. It holds your guttering in place and forms the visible trim between the roof and the outside wall. The soffit is the board underneath, closing the gap between the fascia and the wall of the house. Together, they do three jobs most homeowners never consider: They seal the roof void from wind, rain, birds, and pests They support the guttering system, which controls where rainwater goes They allow the roof space to breathe through ventilation gaps, which reduces condensation risk When either component fails, all three functions are compromised at once, which is why problems here tend to escalate quickly compared with issues on other parts of the property. Materials Used for Fascias and Soffits in the UK Older UK properties, particularly those built before the 1990s, often have timber fascias and soffits. Timber looks attractive when well maintained but requires regular painting or staining, and it is vulnerable to rot once the protective coating breaks down. Most homes renovated in the last two decades use uPVC fascias and soffits instead. uPVC does not rot, does not need repainting, and resists moisture far better than timber. It has become the standard replacement material because it lasts significantly longer with minimal upkeep, which matters for a part of the building that is difficult and costly to access repeatedly. Composite and aluminium options also exist for period or listed properties where uPVC is not permitted, though these are less common on standard residential roofs. Signs Your Fascias and Soffits Need Attention 1. Peeling Paint or Visible Rot on Timber Boards If you have timber fascias, peeling paint is often the first visible clue that moisture is getting underneath the surface. Left unchecked, this leads to soft, spongy timber that can no longer hold fixings securely. 2. Sagging or Detached Guttering Guttering is fixed directly to the fascia board. If the fascia has softened or rotted, the fixings lose their grip and the guttering starts to sag, pull away from the wall, or drop at the joints. This is one of the clearest external signs that the board behind it needs inspection. 3. Water Staining on External Walls Streaks of discolouration running down brickwork below the roofline usually mean water is overshooting the guttering system rather than draining through it properly. This often traces back to a damaged fascia allowing gutters to sit at the wrong angle. 4. Signs of Pest Activity in the Loft Gaps that develop where soffits have cracked or come loose give birds, wasps, and rodents an easy route into the loft space. If you are hearing scratching in the roof void or finding nesting material, damaged soffits are a common entry point worth checking. 5. Damp Patches on Ceilings Near External Walls Because fascias and soffits sit at the junction between roof and wall, water ingress here often shows up as damp patches on upstairs ceilings close to the outer walls, rather than in the centre of a room. 6. Visible Cracking or Warping uPVC can crack under UV exposure and extreme temperature changes over many years, particularly on south facing elevations. Warping or bowing along the length of the board is a sign the material has reached the end of its useful life. Why Ignoring Fascia and Soffit Damage Costs More Later A failing fascia does not stay contained to the roofline. Water that gets behind a cracked board travels along the rafter ends and into the roof structure itself. Left long enough, this leads to rotten rafter feet, which is a structural repair rather than a cosmetic one. Poor ventilation caused by blocked or missing soffit vents also increases the risk of condensation inside the loft. Moist air that cannot escape settles on cold roof timbers and insulation, creating the conditions for mould and timber decay. This is the same mechanism that causes many of the problems homeowners face after adding thicker insulation without checking airflow, something we cover in detail in our guide to loft ventilation and condensation. Replacing fascias and soffits proactively, before water has entered the roof structure, is a fraction of the cost and disruption of repairing rot damaged rafters or replacing sections of roof deck later. Fascias, Soffits, and Roof Ventilation Soffits are not purely cosmetic. Most modern soffit boards include small ventilation slots or a continuous vented strip that allows outside air to enter the roof void at the eaves. This airflow is a core part of how a pitched roof stays dry from the inside. If soffits are replaced with a solid, non vented board, or if vents become blocked with debris, paint, or insulation pushed too far into the eaves, the roof loses this airflow path. That single change can be enough to trigger condensation problems that were not present before, even without any other work being done to the property. Any fascia and soffit replacement should be treated as an opportunity to check that eaves ventilation is adequate for the insulation levels currently in the loft, not simply a like for like swap.